- Install DMASOFTLAB Radius Manager On Ubuntu 10.04 Step By Step .
- DMASOFTLAB Radius Manager 4.1 Short reference manual guide for UBUNTU 10.4 32 /64 Bit Version
- If you have 64bit Ubuntu , then you have to download compatible 64bit packages from the DMA Softlab download section , just note down the 32bit files in this guide, and download 64bit version of same package from the DMA .
- After you have installed Ubuntu, configure IP address and enable internet access on it .
Step-1Access To Terminal Ubuntu by Putty , enter the username and password you entered during the installation of the system , You must change the root password to access all Ubuntu privileges , Follow the following commands :
sudo passwd rootEnter password 1212 for example ,As shown in the picture below .

Step-2In the beginning you should go to the following address ”
/etc/apt/sources.list ” in Ubuntu 10.04 By the following application WinSCP , As shown in the picture below

The ”
sources.list ” must be cleared and replaced with the attached code
#Edit Link By Abdulkader Alrazj , Old Releases Ubuntu Update 20-7-2017 >>> facebook.com/groups/arab.network.forum <<<<<
deb http://old-releases.ubuntu.com/ubuntu/ natty main restricted
deb-src http://old-releases.ubuntu.com/ubuntu/ natty main restricted
deb http://old-releases.ubuntu.com/ubuntu/ natty-updates main restricted
deb-src http://old-releases.ubuntu.com/ubuntu/ natty-updates main restricted
deb http://old-releases.ubuntu.com/ubuntu/ natty universe
deb-src http://old-releases.ubuntu.com/ubuntu/ natty universe
deb http://old-releases.ubuntu.com/ubuntu/ natty-updates universe
deb-src http://old-releases.ubuntu.com/ubuntu/ natty-updates universe
deb http://old-releases.ubuntu.com/ubuntu/ natty multiverse
deb-src http://old-releases.ubuntu.com/ubuntu/ natty multiverse
deb http://old-releases.ubuntu.com/ubuntu/ natty-updates multiverse
deb-src http://old-releases.ubuntu.com/ubuntu/ natty-updates multiverse
deb http://old-releases.ubuntu.com/ubuntu natty-security main restricted
deb-src http://old-releases.ubuntu.com/ubuntu natty-security main restricted
deb http://old-releases.ubuntu.com/ubuntu natty-security universe
deb-src http://old-releases.ubuntu.com/ubuntu natty-security universe
deb http://old-releases.ubuntu.com/ubuntu natty-security multiverse
deb-src http://old-releases.ubuntu.com/ubuntu natty-security multiverse
As shown in the picture below

Step-3sudo -ienter the password you entered during the installation of the system
apt-get updateIt must be , As shown in the picture below

update is Done ;

Step-4Install the required packages in one step using the command below :
apt-get install mc wget rcconf make gcc mysql-server mysql-client libmysqlclient15-dev libperl-dev curl php5 php5-mysql php5-cli php5-curl php5-mcrypt php5-gd php5-snmp freeradius-mysql apache2 apache2.2-common php5-cliAfter this operation, 194MB of additional disk space will be used.
Do you want to continue [Y/n]?
Enter the option
yalso enter the password for mysql twice, when requested , As shown in the picture below :

If you see the following message as shown in the picture , just press ” Enter ”

All packages are installed , As shown in the picture below :

Step-5
Download and install the system files library from the company website, choose libraries according to your system environment whether 32 or 64 bit , Please enter Command of numbers from 1 to 4 in the order :
***** 32 Bit OS *******
1 wget http://www.dmasoftlab.com/cont/download/libltdl3_1.5.24-1ubuntu1_i386.deb
2 wget http://www.dmasoftlab.com/cont/download/libltdl3-dev_1.5.24-1ubuntu1_i386.deb
3 dpkg -i libltdl3_1.5.24-1ubuntu1_i386.deb
4 dpkg -i libltdl3-dev_1.5.24-1ubuntu1_i386.deb
***** 64 Bit OS *******
1
wget http://dmasoftlab.com/cont/download/libltdl3_1.5.26-1ubuntu1_amd64.deb2
wget http://dmasoftlab.com/cont/download/libltdl3-dev_1.5.26-1ubuntu1_amd64.deb3
dpkg -i libltdl3_1.5.26-1ubuntu1_amd64.deb4
dpkg -i libltdl3-dev_1.5.26-1ubuntu1_amd64.debfiles library is installed , As shown in the picture below:

Step-6Installation procedure of ionCube runtime system , Radius Manager requires ionCube runtime system , choose ionCube loader according to your system environment whether 32 or 64 bit .
In the beginning you should go to the following address :
1
cd /usr/local***** 32 Bit OS *******
1
wget http://www.dmasoftlab.com/cont/download/ioncube_loaders_lin_x86.tar.gz2
tar -xvf ioncube_loaders_lin_x86.tar.gz3
cd ioncube4
cp loader-wizard.php /var/www***** 64 Bit OS *******
1
wget http://www.dmasoftlab.com/cont/download/ioncube_loaders_lin_x86-64.tar.gz2
tar -xvf ioncube_loaders_lin_x86-64.tar.gz3
cd ioncube4
cp loader-wizard.php /var/wwwTest the ionCube loader from shell :
php -vAssuming You have configured ionCube properly You have to see the correct ionCube version :

- And finally Add the appropriate ionCube loader to your php.ini
1
echo "zend_extension=/usr/local/ioncube/ioncube_loader_lin_5.3.so" >> /etc/php5/apache2/php.ini2
echo "zend_extension=/usr/local/ioncube/ioncube_loader_lin_5.3.so" >> /etc/php5/cli/php.iniadd is done , As shown in the picture below :

- Now you must restart Apache2 Server Continue inserting this command :
service apache2 restartِApache Server restored , As shown in the picture below :

- Now Check Ioncube Loader file in Web Interface , By going to the following address :
Your-IP-Address/loader-wizard.php
- Loader Installed , PHP is Work , As shown in the picture below :
Step-7
- Installation procedure of FreeRadius , Radius Manager requires the latest FreeRadius 2.2.0 DMA patch. This custom built FreeRadius , is prepared and tested by our software engineers and guarantees 100% compatibility with Radius
Manager , Other versions and builds are incompatible, do not use them. If your host already has a different
FreeRadius version installed, remove it completely (including the configuration files /usr/local/etc/raddb).
- Follow the installation steps below to successfully build, install and configure FreeRadius on your Linux host :
1 wget http://dmasoftlab.com/cont/download/freeradius-server-2.2.0-dma-patch-2.tar.gz
2 tar -xvf freeradius-server-2.2.0-dma-patch-2.tar.gz
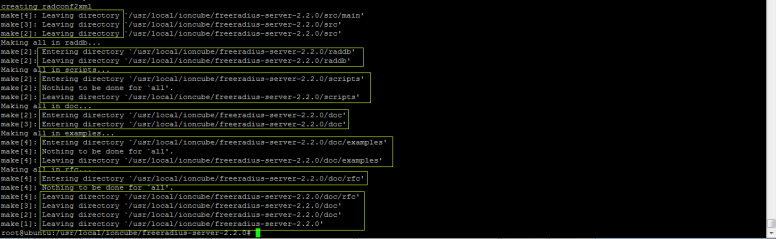
3 cd freeradius-server-2.2.0
- When you are finished it , should be like the picture :
- Configuring Freeradius , “It may take 4 minutes”
1
./configureWhen you are finished it , should be like the picture :

2
make , “It may take 5 minutes”
When you are finished it , should be like the picture :
3
make install , “It may take 1 minutes”
When you are finished it , should be like the picture :

- Continue, enter the following command :
ldconfigWhen you are finished it , should be like the picture :

- Testing Free Radius in Terminal :
radtest user 1111 localhost 1812 testing123When you are finished Test , should be like the picture :

- Verify freeradius installation by issuing , you need to kill the above process find the process id and then issue kill command specifying the process id .
enter the following command :
ps ax | grep radiusWhen you are enter command , should be like the picture :

kill [pid] pid ?
kill 7184 Note : The PID does not have the same value each time, so you must enter
ps ax | grep radius command to get in each time PID .
When you are finished it , should be like the picture :

- Continue, Verify freeradius installation by issuing, enter the following command :
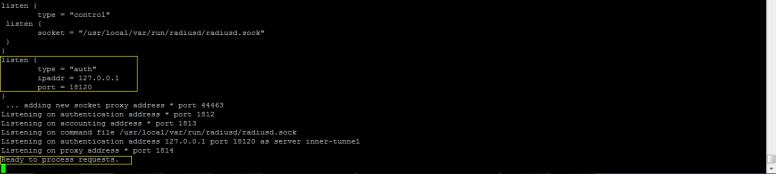
radiusd -XWhen you are finished it , should be like the picture :
- Radius Manager updates clients.conf automatically. It is necessary to set the correct permissions on the affected files On Ubuntu “Debian” :
1
chown www-data /usr/local/etc/raddb2
chown www-data /usr/local/etc/raddb/clients.confWhen you are finished it , should be like the picture :

Step-8
- Create MySQL databases and MySQL users. Follow the following MySQL command line :
- Please enter Command of numbers from 1 to 8 in the order
1
mysql -p enter the password you entered during the installation of the mysql , like the picture ” Example ” :

2
CREATE DATABASE radius;3
CREATE DATABASE conntrack;4
CREATE USER 'radius'@'localhost' IDENTIFIED BY 'radius123';5
CREATE USER 'conntrack'@'localhost' IDENTIFIED BY 'conn123';6
GRANT ALL ON radius.* TO radius@localhost;7
GRANT ALL ON conntrack.* TO conntrack@localhost;8
exitWhen you are finished it , should be like the picture :

Step-9
- Installation procedure of Radius Manager , Two installation modes are available :
1. Interactive, using the install.sh script (recommended) ” We choose this option ”
2. Manual, with Unix commands and / or Midnight Commander.
- * Interactive installation : The easiest way to install Radius Manager is to launch install.sh installer script. It is located in
Radius Manager tar archive and supports Redhat and Debian based systems. Before You begin , ensure You have prepared the MySQL database tables and credentials. Radius Manager requires
two databases:
1- RADIUS – Storage for system data, user base and accounting information.
2- CONNTRACK – Connection Tracking System (CTS) storage.
Create both databases even on a non CTS system.
After decompressing Radius Manager tar archive (tar xvf [filename]), set 755 permission on install.
sh and launch it. In the example below we will run install.sh on a Ubuntu “Debian” system :
- Downloading & Installation Radius Manager 4.1.0
wget http://aacable.rdo.pt/files/rm_related/radiusmanager-4.1.0.tgz
tar -xvf radiusmanager-4.1.0.tgz
1-
tar -xvf radiusmanager-4.1.0.tgz2-
cd radiusmanager-4.1.03-
chmod 775 ./install.shWhen you are finished it , should be like the picture :

- Follow the following commands :
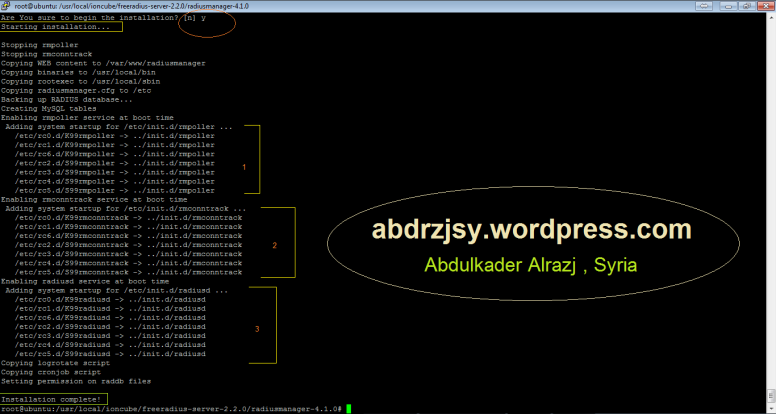
./install.sh
- Select Options like Photo :

When you are finished ./
Install.sh , should be like the picture :
- Now copy the two license files ( that you receive from DMASOFTLAB ) in /var/www/radiusmanager As shown in the picture :
- Setting Permissions for Binaries , and Change Permissions & Owner for /etc/radiusmanager.cfg , Change Permissions for tmpimages :
1-
chmod 775 /usr/local/bin/rmauth2-
chmod 775 /usr/local/bin/rmpoller3-
chmod 775 /usr/local/bin/rmconntrack4-
chmod 600 /etc/radiusmanager.cfg5-
chown root.root /etc/radiusmanager.cfg6-
chown www-data /var/www/radiusmanager/tmpimagesWhen you are finished it , should be like the picture :

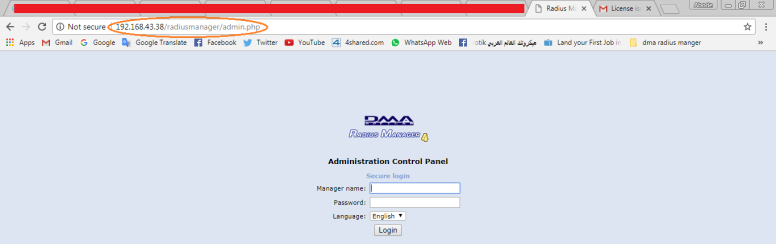
- Now access the admin panel from your browser , http://yourip/radiusmanager/admin.php , As showed in the image below , Default Username & Password ” Username – admin , Password – 1111 ” :
Step-10
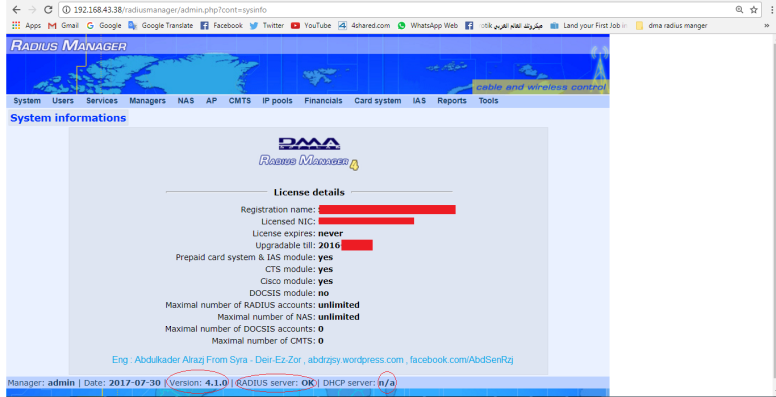
- RADIUS server: NOT RUNNING! , As shown in the picture below :
- In this case we need to add the following code, in the directory /etc/rc.local
echo ---++++ Linux Syria _ Abdulkader Alrazj ++++--- && echo Please Wait Kill Port Rafdius && sleep 2s && echo Check Release Linux && lsb_release -a && sleep 2s && echo Kill All Port in 3 Sec && killall freeradius && sleep 3s &&echo System Restart Server Radius && service radiusd restart && echo System Restart Server apache2 && sleep 2s && service apache2 restart && echo ... OK ! Config By Abdulkader Alrazj && sleep 5sWhen you are finished it , should be like the picture :

Then we restart Ubuntu
reboot
- When you Ubuntu Boot , you should as the picture below :
- In the end, a picture of the license status , If you have any questions, please send a message to my personal email, or via Facebook :